BLoC 模式入门
摘要:讲解如何使用流行的 BLoC 模式来架构你的 Flutter 应用,以及通过 Dart streams 来管理组件的数据流。
版本:Dart 2, Flutter 1.7, Android Studio 3.4
在应用开发领域,如何设计一个应用的结构通常是最具争议的话题之一。每个人似乎都有他们最喜欢的带有花俏首字母缩写词的架构模式。
iOS 和 Android 开发者擅长使用 Model-View-Controller (MVC),并且默认会选择这种模式来开发应用。Model 和 View 是分离的,然后通过 Controller 在它们之间传递信息。
然而,Flutter 带来了一种新的和 MVC 不完全兼容的响应式风格 - BLoC。它兴起于社区,是经典模式(MVC)的一种变体。
BLoC 代表 Business Logic Components(业务逻辑组件)的意思。BLoC 模式的主旨是应用中的所有事务都应该用事件流(stream of events)来表示:组件(widget)提交事件;其他组件响应事件。BLoCs 处于这个过程的中间,管理相互间的会话。Dart 提供了一些语法来处理流,而流本身也是这门语言的内置功能。
关于这个模式最棒的地方是,你不需要引入任何插件或者学习某种定制的语法。Flutter 提供了你所需要的一切。
在这个教程中,你会创建一个应用来查找餐馆,使用的是 Zomato 提供的 API。在教程的最后,这个应用可以做以下这些事:
- 用 BLoC 模式包装 API 调用
- 搜索餐馆并且异步地展示结果
- 维护一个最喜欢餐馆的列表,并且可以在多个页面查看
正式开始
通过 Download Materials (请到原文中下载) 按钮下载初始化项目,然后用你最喜欢的 IDE 打开。在这个教程中,我会使用 Android Studio,如果你喜欢你也可以使用 Visual Studio Code。确保运行了 flutter packages get 命令来下载最新版本的 http 包,这可以通过命令行或者 IDE 弹窗提示来操作。
初始化项目包含了一些基本的样板代码和从网络下载的文件。当你打开这个项目,它应该像下面这样:
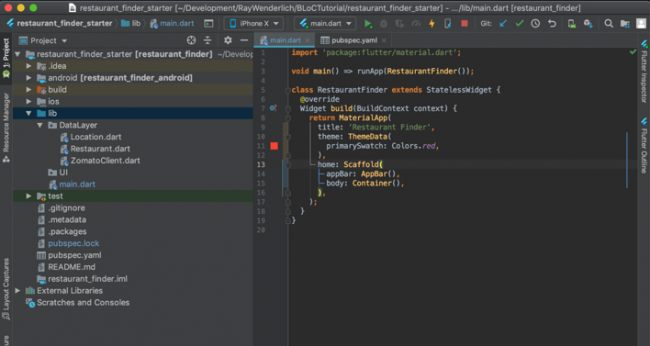
有三个需要和 Zomato 交互的文件。
获得一个 Zomato API Key
在开始开发应用之前,你需要获得一个 API key。去 Zomato 开发者网站 https://developers.zomato.com/api 创建一个账号,生成一个新的 key。
然后打开 DataLayer 目录下的 zomato_client.dart 文件,修改类声明下面的常量:
class ZomatoClient {
  final _apiKey = 'PASTE YOUR API KEY HERE';
  ...
注意:生产环境最好不要把 API keys 存储在源码或者放到版本管理中。最好在构建的时候通过配置文件读取。
构建并运行应用,它会显示一个空白的页面。

这有点单调乏味,我们现在就来修改它。
我们来烤一个夹心蛋糕
当我们写应用的时候,不管是使用 Flutter 或者其他框架,对类进行分层是非常重要的。这更多是一种非正式的习惯,而不是你在代码里可以看到的具体的东西。
每一层,或者说一组类,大体上负责一种任务。初始化的项目包含了一个叫 DataLayer 的目录,这个数据层负责应用的模型以及和后端连接,它完全不关心 UI 的部分。
每个项目多少会有些不同,但总体上,你会构建出类似下面这样的东西:
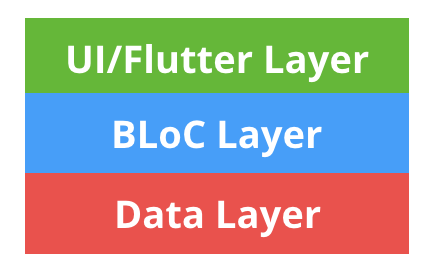
这种架构约定并没有和经典的 MVC 有多大的不同。UI/Flutter 层只能和 BLoC 层通信。BLoC 层向 Data 和 UI 层发送事件并且处理业务逻辑。这种结构可以很好地随着应用增强而进行扩展。
BLoC 的内部构成
BLoC 模式真的只是围绕 Dart streams 的接口而已:
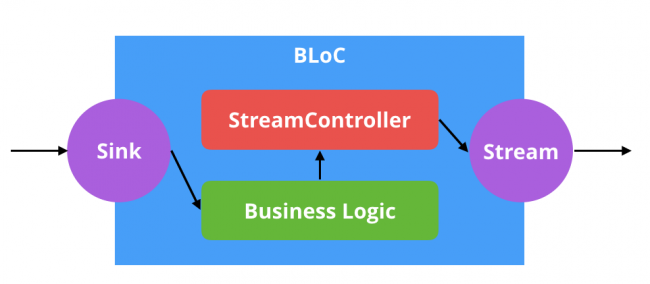
Streams,就像 Futures,是由 dart:async 这个包提供的。一个 stream 就像一个 Future,和 Future 只能异步地返回一个值不同,stream 可以随着时间推移产生很多的值。如果 Future 是一个最终会被提供的值,那么 stream 就是随着时间推移断断续续提供的一系列的值。
dart:async 这个包提供了一个对象叫做 StreamController。StreamController 是拥有管理角色的对象,能够实例化一个 stream 和一个 sink。sink 是 stream 的对立面。一个 stream 随着时间会输出很多值,而一个 sink 会随着时间输入很多值。
总而言之,BLoC 是处理和储存业务逻辑的对象,通过 sink 来接收输入,通过 stream 来提供输出。
地理位置页面
在你能使用应用找到好餐馆之前,你需要先告诉 Zomato 你想在哪里吃饭。在这个部分,你会创建一个简单的页面,包含了一个顶部的搜索框,以及一个用来展示结果的列表。
注意:不要忘了在写代码之前开启 DartFmt。这是开发 Flutter 应用的正确姿势。
在 lib/UI 目录下,创建一个新文件 location_screen.dart。在这个文件中增加一个名为 LocationScreen 的 StatelessWidget:
import 'package:flutter/material.dart';
class LocationScreen extends StatelessWidget {
  @override
  Widget build(BuildContext context) {
    return Scaffold(
      appBar: AppBar(title: Text('Where do you want to eat?')),
      body: Column(
        children: <Widget>[
          Padding(
            padding: const EdgeInsets.all(10.0),
            child: TextField(
              decoration: InputDecoration(
                  border: OutlineInputBorder(), hintText: 'Enter a location'),
              onChanged: (query) { },
            ),
          ),
          Expanded(
            child: _buildResults(),
          )
        ],
      ),
    );
  }


  Widget _buildResults() {
    return Center(child: Text('Enter a location'));
  }
 }
位置页面包含了一个 TextField,用户可以输入位置。
注意:当你使用一个没有引入的类的时候,IDE 会报错。你可以把鼠标移到任何有红色下划线的符号上,然后敲击 macOS 的 option+enter(或 Windows/Linux 的 Alt+Enter)或者点击红色的灯泡。这会弹出一个菜单,你可以在其中选择需要导入的正确的文件。
创建另一个文件,main_screen.dart,这个文件会处理应用的页面跳转。增加下面的代码到文件中:
class MainScreen extends StatelessWidget {
  @override
  Widget build(BuildContext context) {
    return LocationScreen();
  }
}
最后,更新 main.dart 返回这个新的页面。
MaterialApp(
  title: 'Restaurant Finder',
  theme: ThemeData(
    primarySwatch: Colors.red,
  ),
  home: MainScreen(),
),
构建并运行应用,它看起来应该像下面这样:
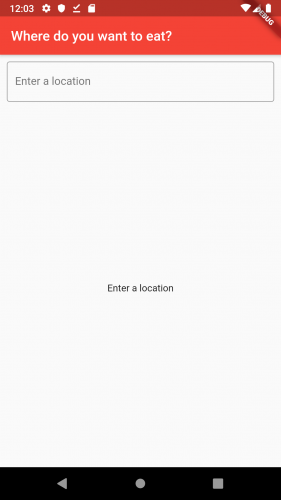
看上去好多了。不过它还是没有做任何事情,现在我们来创建一些 BLoC。
你的第一个 BLoC
在 lib 目录下创建一个叫 BLoC 的文件夹。这个是你所有 BLoC 类的归宿。
在这个文件夹下创建一个叫 bloc.dart 的文件,并且添加以下内容:
abstract class Bloc {
  void dispose();
}
你所有的 BLoC 类都会实现这个接口。这个接口除了强迫你增加一个 dispose 方法外没有做其他事。一个关于使用 stream 需要牢记在心的点是,在使用完它们之后需要关闭它们,否则会引起内存泄漏。dispose 方法就是应用用来检测这一点的地方。
第一个 BLoC 会负责处理应用已选择的地理位置。
在 BLoC 文件夹下,创建一个新文件,location_bloc.dart,添加如下代码:
class LocationBloc implements Bloc {
  Location _location;
  Location get selectedLocation => _location;

  // 1
  final _locationController = StreamController<Location>();

  // 2
  Stream<Location> get locationStream => _locationController.stream;

  // 3
  void selectLocation(Location location) {
    _location = location;
    _locationController.sink.add(location);
  }

  // 4
  @override
  void dispose() {
    _locationController.close();
  }
}
可以使用 option+return,然后选择第二项 Import library package:restaurant_finder/BLoC/bloc.dart 来导入基类。
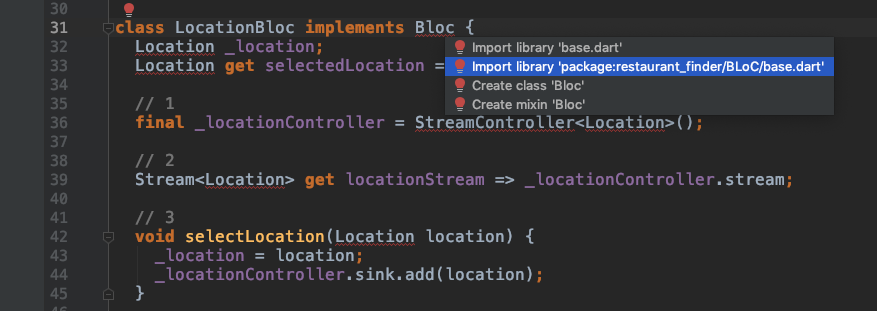
LocationBloc 中的代码做了以下一些事情:
声明了私有的 StreamController 来管理这个 BLoC 的 stream 和 sink。StreamController 使用泛型来告诉类型系统这个 stream 会输出什么类型的对象。
这一行暴露了一个 StreamController stream 的公共 getter。
这个函数代表了 BLoC 的输入。它会接收一个 Location 对象,然后缓存到私有的
_location属性中,最后输入到 sink 中供 stream 使用。最后,在清理方法中,当这个对象被释放后 StreamController 被关闭。如果你不这样做,IDE 会警告 StreamController 内存泄漏。
现在你的第一个 BLoC 完成了,你马上就要创建另一个来读取位置信息。
你的第二个 BLoC
在 BLoC 目录下新建一个文件,名为 location_query_bloc.dart,并添加以下代码:
class LocationQueryBloc implements Bloc {
  final _controller = StreamController<List<Location>>();
  final _client = ZomatoClient();
  Stream<List<Location>> get locationStream => _controller.stream;

  void submitQuery(String query) async {
    // 1
    final results = await _client.fetchLocations(query);
    _controller.sink.add(results);
  }

  @override
  void dispose() {
    _controller.close();
  }
}
//1 的位置是 BLoC 的输入,这个方法接收一个字符串,然后使用初始化项目中的 ZomatoClient 类从 API 请求位置信息。这个地方使用了 Dart 的 async/await 语法使得代码更加简洁。返回的结果会发布给 stream。
这个 BLoC 和前面的几乎一样,只不过封装了一个 API 调用,而不仅仅是存储和提供给位置信息。
把 BloCs 注入到 Widget 树中
现在你有了两个 BLoC,你需要一种方式把它们注入到 Flutter 的 widget 树中。Flutter 中习惯叫这些类型的 widget 为 provider。一个 provider 就是一个存储数据并且提供数据给它所有后代的 widget。
通常这是 InheritedWidget 做的事情,但因为 BLoC 需要销毁,所以选择了 StatefulWidget 提供这种服务。语法会稍微复杂一些,但结果是一样的。
在 BLoC 目录下创建一个文件叫 bloc_provider.dart,并添加以下内容:
// 1
class BlocProvider<T extends Bloc> extends StatefulWidget {
  final Widget child;
  final T bloc;

  const BlocProvider({Key key, @required this.bloc, @required this.child})
      : super(key: key);

  // 2
  static T of<T extends Bloc>(BuildContext context) {
    final type = _providerType<BlocProvider<T>>();
    final BlocProvider<T> provider = findAncestorWidgetOfExactType(type);
    return provider.bloc;
  }

  // 3
  static Type _providerType<T>() => T;

  @override
  State createState() => _BlocProviderState();
}

class _BlocProviderState extends State<BlocProvider> {
  // 4
  @override
  Widget build(BuildContext context) => widget.child;

  // 5
  @override
  void dispose() {
    widget.bloc.dispose();
    super.dispose();
  }
}
从上面代码中可以看到:
BlocProvider是一个支持泛型的类。泛型T被约束为一个实现了 Bloc 接口的对象。这意味着,provider 只能存储 BLoC 对象。of方法允许 widget 树中的后代 widget 通过当前的构建上下文(build context)来检索获取BlocProvider。这在 Flutter 中是非常通用的模式。这是一种获取泛型类型引用的方式。
这个 widget 的
build方法完全委托给了它的 child。它本身没有做任何渲染的事情。最后,provider 之所以继承
StatefuleWidget的唯一原因就是为了能够访问到dispose方法。当这个 widget 从树中移除时,Flutter 会调用 dispose 方法,进而关闭这个 stream。
连接位置页面
既然用于查找地理位置的 BLoC 层已经完成,那么就开始使用它吧。
首先,在 main.dart 文件中,我们在 MaterialApp 之上添加地理位置的 BLoC 来存储相应的状态。最简单的操作就是把鼠标移到 MaterialApp,然后敲击 option+return(PC 上是 Alt+Enter),在弹出的菜单中,选择 Wrap with a new widget。
注意:这个代码片段受到了 Didier Boelens 这篇极棒文章的启发。这个 widget 并没有做优化,并且理论上是可以改进的。考虑到本篇文章的目的,我们会继续使用这种相对稚拙但在大多数场景中完全可接受的方式。如果你之后在应用的生命周期中发现它会引起性能上的问题,那么可以在 Flutter BLoC 这个包中找到更完备的解决方案。
包裹一个 LocationBloc 类型的 BlocProvider,并且赋值给 bloc 属性一个 LocationBloc。
return BlocProvider<LocationBloc>(
  bloc: LocationBloc(),
  child: MaterialApp(
    title: 'Restaurant Finder',
    theme: ThemeData(
      primarySwatch: Colors.red,
    ),
    home: MainScreen(),
  ),
)
在 material app 之上添加 widget 是一种很好的方式,可以提供数据给多个页面使用。
在 main_screen.dart 这个主页面,你需要做一些类似的事情。在 LocationScreen 上敲击 option+return,在弹窗中选择 “Wrap with StreamBuilder”。像下面这样更新代码:
return StreamBuilder<Location>(
  // 1
  stream: BlocProvider.of<LocationBloc>(context).locationStream,
  builder: (context, snapshot) {
    final location = snapshot.data;

    // 2
    if (location == null) {
      return LocationScreen();
    }

    // This will be changed this later
    return Container();
  },
);
StreamBuilder 就是那个使得 BLoC 模式如此诱人的秘密武器。它会自动监听来自 stream 的事件。当接收到一个新的事件时,builder 方法会被执行,并且会更新 widget 树。有了 StreamBuilder 和 BLoC 模式,在这篇文章中就不再需要调用 setState() 了。
从上面的代码中可以看到:
对于 stream 属性,使用了 of 方法来获取 LocationBloc,并且把它的 stream 添加到了这个 StreamBuilder 中。
刚开始 stream 没有数据,这是完全正常的。如果 stream 没有任何数据,应用会返回一个 LocationScreen。否则,暂时会返回一个空白容器。
接下来,更新 location_screen.dart 中的代码,使用你之前创建的 LocationQueryBloc。不要忘记使用 IDE 的 widget 包裹工具,它会使得代码更新变得更容易。
@override
Widget build(BuildContext context) {
  // 1
  final bloc = LocationQueryBloc();

  // 2
  return BlocProvider<LocationQueryBloc>(
    bloc: bloc,
    child: Scaffold(
      appBar: AppBar(title: Text('Where do you want to eat?')),
      body: Column(
        children: <Widget>[
          Padding(
            padding: const EdgeInsets.all(10.0),
            child: TextField(
              decoration: InputDecoration(
                  border: OutlineInputBorder(), hintText: 'Enter a location'),

              // 3
              onChanged: (query) => bloc.submitQuery(query),
            ),
          ),
          // 4
          Expanded(
            child: _buildResults(bloc),
          )
        ],
      ),
    ),
  );
}
这里:
- 首先,在 build 方法顶部初始化了一个新的 LocationQueryBloc。
- 然后这个 BLoC 被存储在 BlocProvider 中来管理它的生命周期。
- 更新 TextField 的 onChanged 方法来提交输入给 LocationQueryBloc。这会引发调用 Zomato,然后发布找到的位置信息给相应的 stream。
- 把 bloc 传给 _buildResults 方法。
给 LocationScreen 添加一个布尔字段来标识当前页面是否是一个全屏的对话框:
class LocationScreen extends StatelessWidget {
  final bool isFullScreenDialog;
  const LocationScreen({Key key, this.isFullScreenDialog = false})
      : super(key: key);
  ...
这个布尔值仅仅是一个简单的标识(默认是 false),用于位置信息被点击时更改导航行为。
现在更新 _buildResults 方法,增加一个 stream builder 来展示结果列表。你可以使用 “Wrap with StreamBuilder” 命令来更快地更新代码。
Widget _buildResults(LocationQueryBloc bloc) {
  return StreamBuilder<List<Location>>(
    stream: bloc.locationStream,
    builder: (context, snapshot) {

      // 1
      final results = snapshot.data;

      if (results == null) {
        return Center(child: Text('Enter a location'));
      }

      if (results.isEmpty) {
        return Center(child: Text('No Results'));
      }

      return _buildSearchResults(results);
    },
  );
}

Widget _buildSearchResults(List<Location> results) {
  // 2
  return ListView.separated(
    itemCount: results.length,
    separatorBuilder: (BuildContext context, int index) => Divider(),
    itemBuilder: (context, index) {
      final location = results[index];
      return ListTile(
        title: Text(location.title),
        onTap: () {
          // 3
          final locationBloc = BlocProvider.of<LocationBloc>(context);
          locationBloc.selectLocation(location);

          if (isFullScreenDialog) {
            Navigator.of(context).pop();
          }
        },
      );
    },
  );
}
从上面的代码中可以看到:
- stream 可能会返回三种状态。首先,可能没有数据,这意味着用户还没有输入。其次,可能是一个空列表,意味着 Zomato 找不到你输入的地址。最后,可能返回一个餐馆列表,这意味着一切完美。
- 这是顺利得到列表的情况,应用会展示一个位置列表。这个函数和普通的声明式 Flutter 代码没有什么区别。
- 在 onTap 函数中,应用从 widget 树顶层中检索得到 LocationBloc,并告诉它用户选择了一个地理位置。现在点击某个列表项会引起整个页面黑屏。
赶紧动手自己试试吧。这个应用现在应该能够从 Zomato 得到位置信息然后通过列表展示出来。
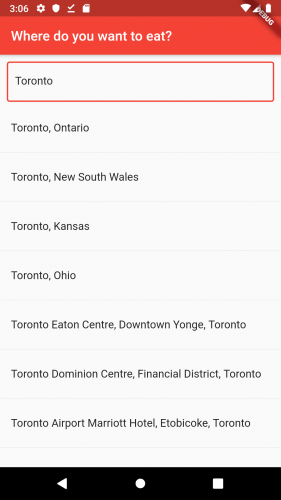
很棒!进展不错。
餐馆页面
应用的第二页面是一个餐馆页面,会基于搜索结果展示一个餐馆列表。它也会有自己的 BLoC 对象来管理状态。
在 BLoC 目录下新建 restaurant_bloc.dart,添加以下代码:
class RestaurantBloc implements Bloc {
  final Location location;
  final _client = ZomatoClient();
  final _controller = StreamController<List<Restaurant>>();

  Stream<List<Restaurant>> get stream => _controller.stream;
  RestaurantBloc(this.location);

  void submitQuery(String query) async {
    final results = await _client.fetchRestaurants(location, query);
    _controller.sink.add(results);
  }

  @override
  void dispose() {
    _controller.close();
  }
}
这个 LocationQueryBloc 几乎是一样的。不同的仅仅是 API 调用以及返回的数据类型。
现在在 UI 目录下创建 restaurant_screen.dart 文件来使用这个新的 BLoC:
class RestaurantScreen extends StatelessWidget {
  final Location location;

  const RestaurantScreen({Key key, @required this.location}) : super(key: key);

  @override
  Widget build(BuildContext context) {
    return Scaffold(
      appBar: AppBar(
        title: Text(location.title),
      ),
      body: _buildSearch(context),
    );
  }

  Widget _buildSearch(BuildContext context) {
    final bloc = RestaurantBloc(location);

    return BlocProvider<RestaurantBloc>(
      bloc: bloc,
      child: Column(
        children: <Widget>[
          Padding(
            padding: const EdgeInsets.all(10.0),
            child: TextField(
              decoration: InputDecoration(
                  border: OutlineInputBorder(),
                  hintText: 'What do you want to eat?'),
              onChanged: (query) => bloc.submitQuery(query),
            ),
          ),
          Expanded(
            child: _buildStreamBuilder(bloc),
          )
        ],
      ),
    );
  }

  Widget _buildStreamBuilder(RestaurantBloc bloc) {
    return StreamBuilder(
      stream: bloc.stream,
      builder: (context, snapshot) {
        final results = snapshot.data;

        if (results == null) {
          return Center(child: Text('Enter a restaurant name or cuisine type'));
        }

        if (results.isEmpty) {
          return Center(child: Text('No Results'));
        }

        return _buildSearchResults(results);
      },
    );
  }

  Widget _buildSearchResults(List<Restaurant> results) {
    return ListView.separated(
      itemCount: results.length,
      separatorBuilder: (context, index) => Divider(),
      itemBuilder: (context, index) {
        final restaurant = results[index];
        return RestaurantTile(restaurant: restaurant);
      },
    );
  }
}
新增一个单独的文件 restaurant_tile.dart 来展示这些餐馆的细节:
class RestaurantTile extends StatelessWidget {
  const RestaurantTile({
    Key key,
    @required this.restaurant,
  }) : super(key: key);

  final Restaurant restaurant;

  @override
  Widget build(BuildContext context) {
    return ListTile(
      leading: ImageContainer(width: 50, height: 50, url: restaurant.thumbUrl),
      title: Text(restaurant.name),
      trailing: Icon(Icons.keyboard_arrow_right),
    );
  }
}
这个代码和位置页面的应该很相似,几乎是一样的。不同的地方只是它展示的是餐馆而不是地理位置。
修改 main_screen.dart 文件中的 MainScreen,现在当接收到位置信息的时候就返回一个餐馆页面。
builder: (context, snapshot) {
  final location = snapshot.data;

  if (location == null) {
    return LocationScreen();
  }

  return RestaurantScreen(location: location);
},
重启应用。当你选择来一个地理位置,并且输入了想吃什么就能得到一个餐馆列表:
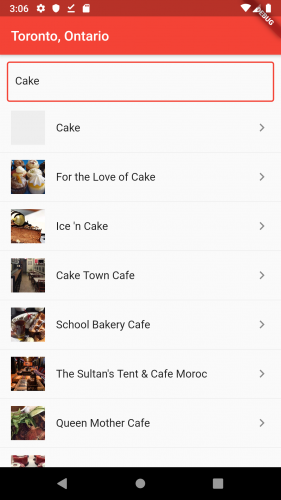
看起来很美味。有谁准备吃蛋糕吗?
最喜欢的餐馆
目前为止,BLoC 模式被用来管理用户输入,但它可以做更多的事情。比如用户想要记录他们最喜欢的餐馆,并且在一个单独的列表中展示,这同样可以通过 BLoC 模式解决。
在 BLoC 目录下,创建一个新文件 favorite_bloc.dart,定义一个 BLoC 来存储最喜欢餐馆列表:
class FavoriteBloc implements Bloc {
  var _restaurants = <Restaurant>[];
  List<Restaurant> get favorites => _restaurants;
  // 1
  final _controller = StreamController<List<Restaurant>>.broadcast();
  Stream<List<Restaurant>> get favoritesStream => _controller.stream;

  void toggleRestaurant(Restaurant restaurant) {
    if (_restaurants.contains(restaurant)) {
      _restaurants.remove(restaurant);
    } else {
      _restaurants.add(restaurant);
    }

    _controller.sink.add(_restaurants);
  }

  @override
  void dispose() {
    _controller.close();
  }
}
// 1 处,BLoC 使用了 Broadcast StreamController,而不是常规的 StreamController。Broadcast stream 允许有多个监听器,而常规的 stream 只允许一个。对于之前的两个 bloc,因为只是一对一的关系,所以并不需要多个 stream 监听。而最喜欢餐馆的这个功能,应用需要在两个地方监听这个 stream,所以 broadcast 是必需的。
作为设计 BLoC 的一种通用规则,一开始可以先使用普通的 stream controller,然后后续根据需要再修改成 broadcast stream。如果多个监听器监听同一个常规 stream,Flutter 会抛出一个异常。你可以使用这个作为代码需要被更新的信号。
这个 BLoC 需要被很多页面使用,这意味着它需要放在导航之上。更新 main.dart,将 MaterialApp 用另一个 provider 包裹。
return BlocProvider<LocationBloc>(
  bloc: LocationBloc(),
  child: BlocProvider<FavoriteBloc>(
    bloc: FavoriteBloc(),
    child: MaterialApp(
      title: 'Restaurant Finder',
      theme: ThemeData(
        primarySwatch: Colors.red,
      ),
      home: MainScreen(),
    ),
  ),
);
接下来,在 UI 目录下创建一个 favorite_screen.dart 文件。这个文件中的 widget 会展示最喜欢餐馆的列表。
class FavoriteScreen extends StatelessWidget {
  @override
  Widget build(BuildContext context) {
    final bloc = BlocProvider.of<FavoriteBloc>(context);

    return Scaffold(
      appBar: AppBar(
        title: Text('Favorites'),
      ),
      body: StreamBuilder<List<Restaurant>>(
        stream: bloc.favoritesStream,
        // 1
        initialData: bloc.favorites,
        builder: (context, snapshot) {
          // 2
          List<Restaurant> favorites =
              (snapshot.connectionState == ConnectionState.waiting)
                  ? bloc.favorites
                  : snapshot.data;

          if (favorites == null || favorites.isEmpty) {
            return Center(child: Text('No Favorites'));
          }

          return ListView.separated(
            itemCount: favorites.length,
            separatorBuilder: (context, index) => Divider(),
            itemBuilder: (context, index) {
              final restaurant = favorites[index];
              return RestaurantTile(restaurant: restaurant);
            },
          );
        },
      ),
    );
  }
}
在这个 widget 中:
这个地方给 StreamBuilder 增加了初始化数据。StreamBuilders 会立即触发 builder 函数,尽管它还没有数据。这避免了无谓地重绘屏幕,让 Flutter 确信 snapshot 永远有数据。
这个地方应用检查了 stream 的状态,如果还没有连接完成,则使用一个已有的明确的最喜欢餐馆的列表,而不是等待 stream 的新事件。
现在更新餐馆页面的 build 方法,增加一个事件来跳转到最喜欢餐馆页面。
@override
Widget build(BuildContext context) {
  return Scaffold(
      appBar: AppBar(
        title: Text(location.title),
        actions: <Widget>[
          IconButton(
            icon: Icon(Icons.favorite_border),
            onPressed: () => Navigator.of(context)
                .push(MaterialPageRoute(builder: (_) => FavoriteScreen())),
          )
        ],
      ),
      body: _buildSearch(context),
  );
}
我们需要一个餐馆详情页来添加餐馆到最喜欢的列表中。
在 UI 目录下,创建一个 restaurant_details_screen.dart 文件。这个页面的大部分都是静态布局代码:
class RestaurantDetailsScreen extends StatelessWidget {
  final Restaurant restaurant;

  const RestaurantDetailsScreen({Key key, this.restaurant}) : super(key: key);

  @override
  Widget build(BuildContext context) {
    final textTheme = Theme.of(context).textTheme;

    return Scaffold(
      appBar: AppBar(title: Text(restaurant.name)),
      body: Column(
        crossAxisAlignment: CrossAxisAlignment.start,
        children: <Widget>[
          _buildBanner(),
          Padding(
            padding: const EdgeInsets.all(8.0),
            child: Column(
              crossAxisAlignment: CrossAxisAlignment.start,
              children: <Widget>[
                Text(
                  restaurant.cuisines,
                  style: textTheme.subtitle.copyWith(fontSize: 18),
                ),
                Text(
                  restaurant.address,
                  style: TextStyle(fontSize: 18, fontWeight: FontWeight.w100),
                ),
              ],
            ),
          ),
          _buildDetails(context),
          _buildFavoriteButton(context)
        ],
      ),
    );
  }

  Widget _buildBanner() {
    return ImageContainer(
      height: 200,
      url: restaurant.imageUrl,
    );
  }

  Widget _buildDetails(BuildContext context) {
    final style = TextStyle(fontSize: 16);

    return Padding(
      padding: EdgeInsets.only(left: 10),
      child: Row(
        mainAxisAlignment: MainAxisAlignment.start,
        children: <Widget>[
          Text(
            'Price: ${restaurant.priceDisplay}',
            style: style,
          ),
          SizedBox(width: 40),
          Text(
            'Rating: ${restaurant.rating.average}',
            style: style,
          ),
        ],
      ),
    );
  }

  // 1
  Widget _buildFavoriteButton(BuildContext context) {
    final bloc = BlocProvider.of<FavoriteBloc>(context);
    return StreamBuilder<List<Restaurant>>(
      stream: bloc.favoritesStream,
      initialData: bloc.favorites,
      builder: (context, snapshot) {
        List<Restaurant> favorites =
            (snapshot.connectionState == ConnectionState.waiting)
                ? bloc.favorites
                : snapshot.data;
        bool isFavorite = favorites.contains(restaurant);

        return FlatButton.icon(
          // 2
          onPressed: () => bloc.toggleRestaurant(restaurant),
          textColor: isFavorite ? Theme.of(context).accentColor : null,
          icon: Icon(isFavorite ? Icons.favorite : Icons.favorite_border),
          label: Text('Favorite'),
        );
      },
    );
  }
}
在上面的代码中:
- 这个 widget 使用了 favorites stream 来判断当前餐馆是否是最喜欢之一,然后渲染相应的 widget。
- toggleRestaurant 在 FavoriteBloc 已经实现,所以 UI 中不需要知道当前餐馆的状态。它只需要负责添加或从列表中删除就可以了。
在 restaurant_tile.dart 文件的 onTap 方法中添加路由导航到新页面。
onTap: () {
  Navigator.of(context).push(
    MaterialPageRoute(
      builder: (context) =>
          RestaurantDetailsScreen(restaurant: restaurant),
    ),
  );
},
构建并运行应用,尝试一下新功能。
用户现在应该可以查看最喜欢餐馆的列表,并且可以添加也可以移除餐馆。我们在没有添加更多代码的情况下就能做到将餐馆从最喜欢的列表中移除,这正是 stream 在实际应用中的强大之处。
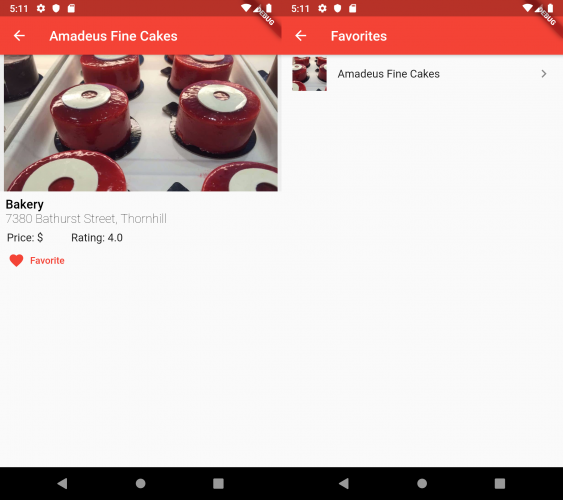
更新地理位置
如果用户想要修改他们搜索的地理位置该如何做呢?现在,你如果想要修改位置,只能重启应用。
但你已经在应用中使用了一系列的 stream,添加这个功能应该是小菜一碟,就像蛋糕上面的一粒小樱桃。
在餐馆页面,添加一个浮动操作按钮,点击以模态框形式展示地理位置页面。
 ...
    body: _buildSearch(context),
    floatingActionButton: FloatingActionButton(
      child: Icon(Icons.edit_location),
      onPressed: () => Navigator.of(context).push(MaterialPageRoute(
          builder: (context) => LocationScreen(
                // 1
                isFullScreenDialog: true,
              ),
          fullscreenDialog: true)),
    ),
  );
}
// 1 处,你设置了 isFullScreenDialog 为 true,这个属性你之前已经添加到位置页面。
然后在 LocationScreen 的 ListTile 中,你添加了 onTap 方法来使用这个 flag。
onTap: () {
  final locationBloc = BlocProvider.of<LocationBloc>(context);
  locationBloc.selectLocation(location);
  if (isFullScreenDialog) {
    Navigator.of(context).pop();
  }
},
之所以要这样做是为了确保当它作为一个模态框展示的时候能够被移除。如果没有这些代码,当 ListTile 被点击的时候,不会发生任何事。位置 stream 会更新,但 UI 不会有响应。
最后我们再来构建和运行一次应用。你现在应该有了一个浮动操作按钮,当点按的时候,会以模态框的形式展示位置页面。
接下去该学什么
恭喜你掌握了 BLoC 模式。BLoC 是一种简单却强大的模式,可以控制应用的状态在 widget 树中上下流动。
你可以通过 Download Materials 按钮(请从原文中下载)下载示例代码。如果你想运行最终的项目,确保在 zomato_client.dart 中添加了你自己的 API key。
一些其他的架构模式也值得研究:
- Provider - https://pub.dev/packages/provider
- Scoped Model – https://pub.dev/packages/scoped_model
- RxDart – https://pub.dev/packages/rxdart
- Redux – https://pub.dev/packages/redux
同时建议看一看 stream 的官方文档, 以及 Google IO 上关于 BLoC 模式的分享。
(欢迎转载,但请保留文章地址)